Wednesday, January 8, 2014

A Dive Into Beer Chemistry With a Brown Ale

New Chemistry Tools :)
Most styles of beer I've wanted to or attempted to brew have been relatively successful with maybe a few mistakes/tweaks here and there.  I have found that a lot of my brown and amber colored beers are not as successful as my lighter and darker ones.  Hop-forward beers like IPAs and barley wine I feel can cover up what might otherwise be an underlying flavor issue.  Over the years I've been brewing I've noticed this issue correlates with a lot of my malt-forward styles (particularly ones with higher amounts of caramel malt).  It's not that these beers didn't taste good.  More that they've just seemed one dimensional and lacking character.  Most of the time I would describe the character as too much caramel.  After trying my best to test different recipes and brewing techniques I believe I have stumbled onto the answer... Quite simply, water.
Faucet from RO filter
More than 90% of beer is water but it is typically the last thing home-brewers really think about.  We concern ourselves so much with the mechanics of brew day and other ingredients that we completely miss the most fundamental ingredient.  Issues with water to a brewer are of course the flavor ions like sodium, chloride and sulfate but on deeper level brewers are concerned about the alkalinity of the water as it is connected to its buffering system.  In all-grain brewing the mash is the black box of brew day.  It is where a lot of the beginning chemistry on brew-day happens.  The reactions that occur in the mash drive the pH downward.  The optimal pH range for the enzymes in the mash is 5.2-5.6 with a target of 5.2.  Being outside of this range can cause a lack of flavor extraction from the grains causing a more one dimensional character.  Too far out of this range, and off flavors and bitter tannin extraction can occur.  There are many things to think about when dialing into the mash pH.  Not only does the water have a buffering system, but the mixture of grains in the mash do as well.  The grains together with the water create a harmony and eventually settle on a pH.  That is to say the grain recipe effects the pH as well as the brewing water does.  Typically the answer to this complicated array of calculations is to use brewing software and either arm yourself with a water report for your city or start from scratch with RO water.  You can then either modify your existing water or build the water profile you want for your recipe with RO/Distilled water.  I have found this online calculator to be more helpful than the brewing software I have http://www.brewersfriend.com/mash-chemistry-and-brewing-water-calculator/.
Since Conway doesn't provide enough detail in their water report for brewers, I felt more in control by starting with RO water.  However, with some testing I have determined that Conway water is low in alkalinity (26ppm as CaCO3).  This makes sense because in order to brew a good brown ale for example you need higher alkalinity (50-150ppm) in the water in order buffer the mash and not allow the pH drop too low.
Brew Day
I targeted a water profile that would be right in the middle for a medium OG brown ale (in ppm.. Ca-75, Mg-5, Na-25, Cl-65, S04-75, Alkalinity-125).  I used 3.75g Gypsum, 2g Epsom, 5g Calcium Chloride, 4.5g Calcium Carbonate, 4.25g Sodium Bicarbonate and got relatively close (in ppm.. Ca-82.9, Mg-5.2, Na-30.7, Cl-63.7, S04-75.9, Alkalinity-124.9).  Calcium Carbonate (chalk) doesn't dissolve almost at all in pure water with out the presence of dissolved CO2.  So I kegged and carbonated 2 gals of RO water then mixed in the minerals (I managed to get most if not all the chalk to dissolve).  The online calculator actually predicted the mash pH within 0.01 (predicted 5.49, actual 5.5).  Had I known it would be that accurate I would have tweaked the mineral concentration to pull closer to 5.2 but instead I used phosphoric acid additions to slowly bring the pH down to 5.2.  With all the additions that need to be made to the mash in order to pull the pH to target, it has gotten harder to maintain the mash temperature. Eventually I will build and move to an electric RIM system in order to maintain temps while testing pH but until then I may use a method like this http://www.cedarcreeknetworks.com/heatstick.htm to maintain mash temps.  At any rate the temperature did manage to stay above 150 for the 60 min mash.  I have brewed this same recipe previously with my tap water.  So I should be able to tell if there is a significant difference between the two beers.  


RIMS Tube I would like to build
RIMS System Diag

Tuesday, December 31, 2013

Baby Brew... Carter's Brew


It's been a while since I've posted anything here for an obvious reason ;). Me and my wife have been blessed with a son.  It's not that I haven't brewed in a year but more that I haven't had the time to write up any documentation on any of the beers I've brewed.  I wanted to go back and make sure I did document one of special importance though.  Long before my wife was even pregnant, the idea of this beer was in the back of my mind. After I found out Carter was on the way I started executing the plan for this massive brew.  This beer is an ice barley wine style beer.  This beer is brewed much like an Eisbock.  Basically the idea is to brew 10 gals of barley wine (9-10%) then freeze the resulting beer and collect the first 5 gallons that thaw off.  The result is a beer that is double in intensity of flavor and alcohol (18-20%).

So that is what I did.  I re-brewed my big-foot barley wine clone recipe but brewed 10 gals at once (first time to brew 10 gals at once).  I had to use two mash-tuns to hold the grain.  Brice and I had to pull double duty on boil over watch. In fact, I boiled a total volume of 14 gallons in my 15 gallon kettle.  As I recall I actually had to remove a gallon, wait till a gallon had boiled off, and then add it back in to stop the boil-overs. I split the batch into two 6 gallon carboys for fermentation.  After fermentation I filled ten one gallon jugs and threw them into the deep freeze.  I only had room to freeze 5 gals at a time.  
I inverted the jugs and collected what didn't completely freeze and let the rest thaw until I had collected a half gallon from each jug.  I poured the roughly 2.5 gallons collected into a keg then did the next 5 gallon batch the same way. 
I ended up with around 5 gallons of freeze distilled (yes this is legal) beer that I then aged for about a month on medium toasted oak.  Afterwards I carbonated and bottled.  I wax sealed the caps on the bottles in order to help the beer age better.  I will be aging this beer for 21 years and give this beer to my son on his 21st birthday :).  Since I have enough bottles, I plan on cracking one a year on his birthday to test the progress on aging. 

In fact, I cracked the first real taste of this the day we brought him home, which leads me to the story of his birth and NICU stay.  My wife gives a better account than I could possibly ever write.  Her well written recap is here: The Story I Never Thought I'd Write.  All in all it was a rough first month but I believe it is behind us now.  Carter is doing much better.  Even though he is behind a little on weight gain, at least he is gaining weight (25th percentile).  His VSD (hole in his heart) is small (possibly closing) and the cardiologist is not concerned.  He is still aspirating a small portion of his feeds (even thickened), but ENT did not find anything abnormal.  We believe part of his issue may be low upper body muscle tone.  Physical therapy may be in his near future or at least a consult. Brewing is a trade I plan on passing down to my son one day.  When he is of age and shows an interest in the hobby hopefully we will brew together.  If not, at least he will have the skills to craft beer for trade when the economy collapses :).


Friday, January 18, 2013

Barley Wine

I've been lining up ideas for my next "big" beer.  I've already tried my hand at something closer to Dogfish's 120 and even though I wouldn't call that a complete failure, it did end up finishing way too sweet.  So I thought I'd initially brew a classic barley wine and maybe use that recipe as a spring board for my next project.  I'm also looking to increase my brew house capacity to 10 gallon batch sizes and with that comes the added need to purchase grains in bulk and mill my own malt.  For my increase to 10 gal I've put together an extra 10 gal mash tun so as to mash double the amount of malt at the same time.  Even though this batch of barley wine was a 5 gal batch I feel that I should have split the malt and mashed in two separate mash-tuns to see if that might have helped my efficiency in this batch.  I used a clone recipe for Sierra Nevada's Big Foot barley wine as the base recipe.  I shot for a typical efficiency of 65% but with 22.5 lbs of malt I ended up around 58%.  I had to modify the recipe a little and added the 2 lbs of DME (all I had on hand) and 1 lb of dextrose to get to the OG I wanted.  I justified the addition of dextrose as a possible method to dry the finish out a little (which made me feel a little better about adding it).  
Enjoying a Barley Wine to start the brew day off
Overall, I've been noticing a decrease in efficiency (usually around 65%) and with most variables staying fairly consistent, I have been pointing the finger at the crush I get from the home-brew shop, but until recently I hadn't had an opportunity to test that theory.  The thought is why would the the home-brew shop give you a good crush? If you get bad efficiency, that just means you have to buy more grain from them and they don't typically charge any extra for milling the grains. 
New Barley Crusher
I recently brewed an IPA with a buddy where we used milled grain from a local brewery in Fayetteville.  Even though we got a stuck mash, the efficiency we got was around 78-80% on my equipment.  So now I know that my efficiency problems are due to the crush the home brew shop is giving me.  

New Quick Disconnects (saves lots of time)
I think I may have picked up a new brew-day tradition...  While I was talking to an assistant brewer at a brewery in Fayetteville, she taught me about a brew-day drink called a "hot-scotchie".  It's where you take a shot of scotch mixed with a little bit of the first runnings from the mash.  The next day, I had a brew-day with my buddy and we tried this so called hot-scotchie... Loved it!  For this brew-day however I didn't have any scotch.  So I made it with some crown (kinda losses something without the scotch though).
Hot-Toddy With the First Runnings
This recipe requires a 2 hour boil. A long boil like that will help caramelize the wort and impart a deeper red color to the beer.  Funny story with this boil though...  Both of my propane tanks were empty on brew day and the only place in town that fills them was closed.  So I was forced to go the exchange route.  Note:  When you exchange (even though you pay the same price as a full fill) you get a tank back that is only 75% filled. So about one hour into the boil the tank ran out and I had to stop the boil and go make another propane run.  Mental note:  I need to make a shield for the burner so as to not waste so much gas.
120 Min Boil
Ended up with OG of 1.108 which will probably turn out to be around 10% ABV.  I will be dry hopping in secondary with about 1.75 oz of hops (keeping on hops for 5 days).

Sunday, September 30, 2012

An American Lager

   By far, the biggest question/response I get from people as soon as I tell them I brew beer is... "So can you brew a Bud Light?"  This is asked normally by people who think if it "ain't" Budweiser, Miller, Coors or similar then it "ain't" beer!  Or that it's somehow anti-american not to drink/serve the beers listed above.  Don't get me wrong - these companies are highly successful and are able to brew a consistent product very well.  The beers they produce are good in their own right.  However, these beers are highly manufactured, mass produced and are brewed with mostly profit in mind.  That said, this style is the hardest to brew at home.  It's like wearing an all-white outfit to a BBQ feast; chances are very high that your outfit will not stay all-white for long.  While it is popular among the home-brew/'beer snob' community to mock the seeming absence of flavor in these beers, it is actually quite difficult to successfully and consistently brew them.  If you're unlucky enough to end up with a defect in the final product there is very little to hide behind.
    So no... I haven't really brewed a bud light nor am I interested in brewing one.  Typically the only reason that home-brewers even attempt to brew this style is to get their stubborn palette, BMC drinking friends to drink their home-brew.
   I'm brewing an American lager style in more of a traditional way without the rice or corn.  Budweiser, Miller and Coors are all American lagers but are brewed with up to 40% rice or corn in addition to barley and hops.  This helps with two things... it lightens the malt flavor and cuts the price of brewing because rice and corn are cheaper than malted barley.  My first attempt at this recipe was fairly successful as stated by other "BMC" drinking individuals who tried it and I actually liked it myself.  So I modified the recipe for a little more body and head retention thinking I'd try to improve it even more.
Brew Day
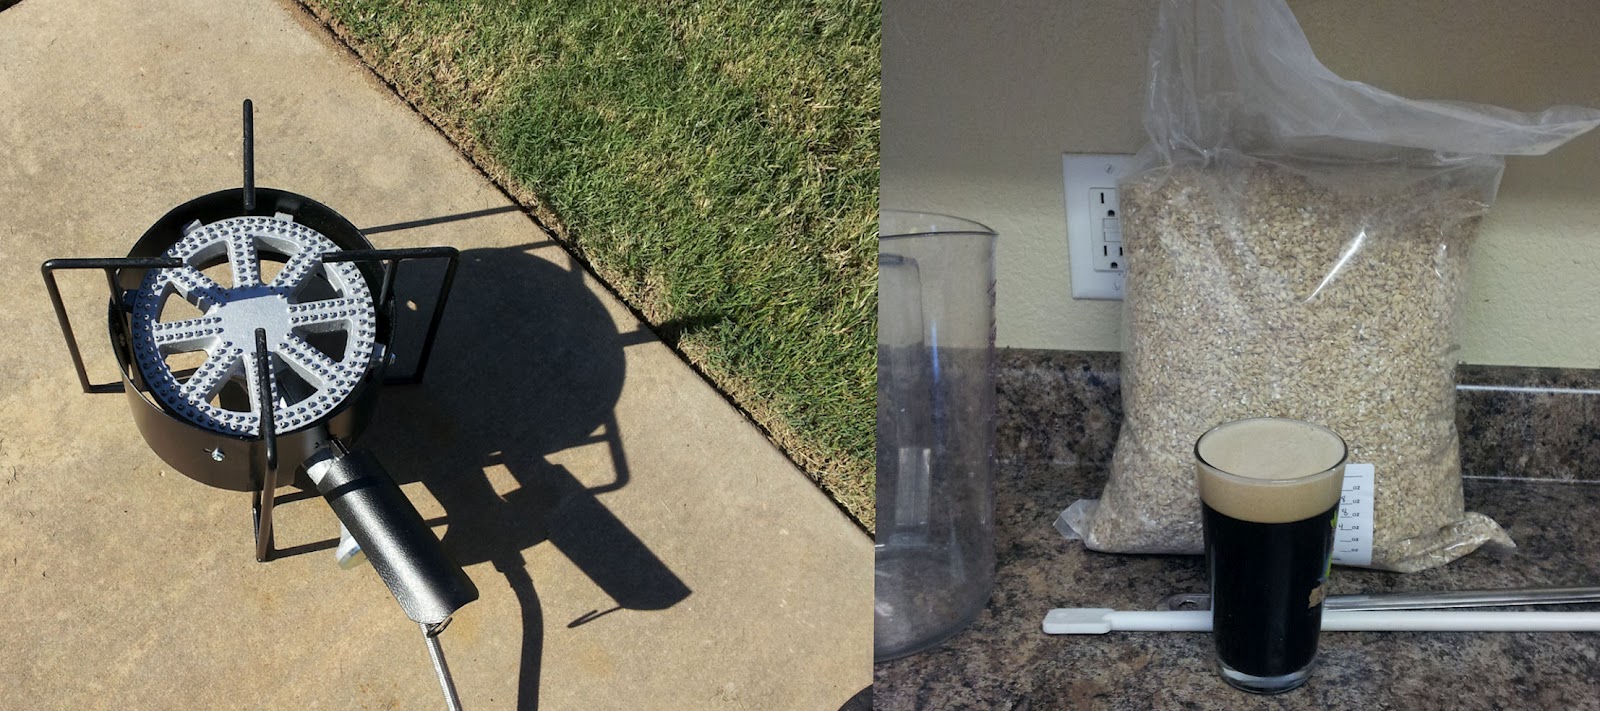
So brew day started out well.  This was my first time to use my new burner.  
New burner and brew day prep.
Unfortunately brew day took a turn for the worst.  Turns out that my new burner had a lot more output than I thought.  The flames from the burner licked up the sides of the kettle and before I knew it had cracked and melted the sight-glass.
Melted and broken sightglass from kettle
I had 7.5-8 gals of boiling hot wort spraying out of my sight-glass while attempting to move the kettle and transfer the liquid into another spare kettle.  Ended up with a couple of burnt fingers and toes.  As a result this brew day was not very well documented.  Although, I did end up breaking my own brew day speed record with a total of 5 hours start to finish including clean up.  The new burner despite the melted sightglass cuts a little less than an hour off my brew day.    
Ended up at 1.039 at 5.5 gals. Did pitch yeast at 83*F though, but performed a D-reset before reaching finial gravity of 1.004.


New Equipment Modifications
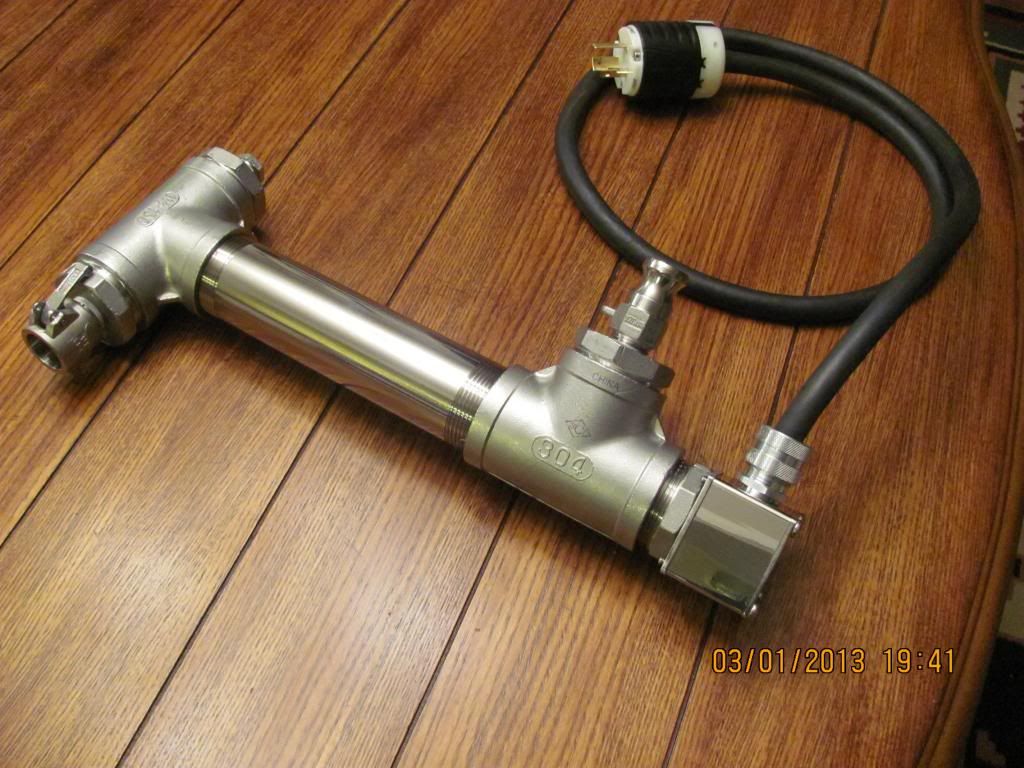
Upgrade from 10 to 15 gal Kettle and added Sight-Glass and Ball Valve. 
Modified new burner with a heat shield to block flame/heat from reaching ball valve or sight-glass

Monday, August 13, 2012

May The Schwarz-Bier With You

Schwarz in German means "black" and bier means "beer".  So schwarzbier literally means "black beer" in German (Pronounced "shvahrts-beer").  It was only recently that I was able to sample an actual imported schwarzbier.  Turns out that the only place that I've been able to get a kostrizer in Arkansas (at least central AR) is at the flying saucer in Little Rock.  Schwarzbier is a dark beer similar to a porter or stout except that being a lager gives it a cleaner crisper finish that tends to smooth out the roast character in the beer.  Schwarbier has a very mild, almost bittersweet, notes of chocolate and coffee.  Over all a very smooth beer to drink and at around 4-5% ABV very session-able as well. So after trying kostizer I decided that I needed to try brewing this style and because of the name and the schwartz line in "Spaceballs", I decided to name it "May The Schwarz-Bier With You".


Since I've been on a diet here recently, it has been hard to brew.  So I used my vacation time to fit in a brew day along with a break from my diet.  Of course writing this while on a diet is fairly hard as well.  The roasted malts in this brew consisted of carafa III and roasted barley.  I was going to add the roasted grains late in the mash as to impart less of the roast character but the home brew supply I order from crushed all the grains together.  So I may do that next time I brew this.
Yeast Starter
I seen other recipes call for german lager yeast.  So I used whitelabs german lager (WLP830).  The use by date on the yeast was October of 2012.  I made a 1.5 quart starter and put it on the stir plate but 24 hours later I checked the gravity and even though fermentation had taken place it didn't ferment very much.  Just in case I decided to pick up another vial of WLP830 to pitch along with the starter on brew day.  
Middle of Mash
My strike temp was 165*F to hit a target temp of 153*F.  Originally I planned for 151 but decided last min to change to 153.  Very thick mash this time (right around 1qt/lb).  Smelled great!
Draining the first and second runnings from the Mash-tun
The sparge water may have ran a little hot on this one because I left one pot on the eye longer, but still should have been under 180*F.  I forgot to get the pearl bittering hops, but I did have some left over cascade from another brew.  Cascade shouldn't make alot of difference as a bittering hop for such a malt heavy brew though.  
75 Min boil
I guess I have left my propane burner (classic turkey fryer setup) out in the rain too long and I now get thick layers of soot on the bottom and sides of my brew kettle every time I boil.  After scrubbing the kettle for about an hour with oxyclean and a scrub sponge, I decided next brew I'm going to be replacing my burner with a banjo burner and start storing the burner inside. 
Ended up with 5.5 gals at 1.046.  So after fermentation that should put me around 1.012 with 4.54% ABV.

Sunday, June 17, 2012

Irish Red Ale

Earlier this month I visited a lot of new breweries popping up around northwest Arkansas with some friends and had a great time sampling and talking over some good pints.  In one of the pubs I actually ran into Andy from Basic Brewing Radio and owner of "The Home Brewery" local Fayetteville home brew shop.  I  talked with him for some time about brewing in general and I came to the realization that in general I brew high gravity beers and really haven't brewed that many beers that would be considered "session" beers.  In other words a beer that is relatively low in alcohol (3.5-4.5%) in which several can be drank in a "session" and still have some hope of driving home.  I still have at least one monster brew left on my to-brew list but I need to start practicing on brewing good session beers especially if I plan on opening up my own brewery one day.  So I decided to brew a style that I haven't brewed before and shoot for a session beer in the style of a Irish Red Ale.  Killian's Irish Red is really a lager and probably not a good example of the style but it is one that is well known.  Although the original recipe was an ale and dates back to 1864, the rights to the name was purchased by Coors in the mid 80's.  Coors just slapped the name on one of their lager recipes.  To me it is a decent beer if you can find it on tap.
Grains and Pre-heating the mash-tun
    I have two cats, Ronon and Rodney.  During brew day Ronon pays no attention and generally stays out of my way.  On the other hand Rodney (in picture above) gets into everything and drives me insane because he prefers to not only get in my way but lick all my sanitized equipment forcing me to re-sanitize and lock him in a room for the remainder of the day.  
    My strike temp for the mash was 163*F to hit a mash temp of 152*F.  I over shot the strike and waited to dump the grains in till it cooled to 163.  The mash temp really hit around 154-155 but I decided not to try to cool it off.  It ended spending most of the time between 151-153 anyways.  As with my recent recipes I targeted an efficiency around 65% and that seems to be giving me plenty of grain that I come close enough to my target O.G consistently.    
Left to Right: Beginning of Mash; End of Mash
I collected 8 gals in my boil kettle from the mash and sparge runnings.  I started the boil off using a propane tank that I only used on one batch.  So my thought was that it should be close to full, but even with the gas turned all the way up the flame wasn't enough to get a very good rolling boil.  So I ended up killing the boil and making a propane run.  The new tank worked out great though.   
Since my goal was to make a session beer all I needed to shoot for was an O.G of 1.045.  I boiled for 60 mins and hit an O.G of 1.047 with 6 gals at 72% efficiency.  That should put me around 4.5% ABV.  With Arkansas temps in the upper 90's it is very hard to chill the wort below 80*F even with a counter-flow plate chiller and ice-water.  So typically for an ale in the summer I chill for 15-20 mins which usually gets me in the low 80's.
Next Day
  Recently I've been preparing my equipment/brewing methods to be able to take on my next extreme high gravity brew.  I'm planning in the future to brew a beer akin to Sam Adam's Utopias (around 28% ABV) maybe by using freeze distilling and aging for a very long time.  I have several beers lined up before I take this monster on but I'm in the planning stages now.  
Pure O2 Through a Diffusion Stone
  One of the changes I'm employing is using pure O2 to oxygenate my chilled wort before pitching the yeast.  By injecting pure O2 through the wort with a diffusion stone I reduce the amount of time it takes to oxygenate to my wort (35-45 sec blast) and add a higher level and purer quality of O2 in the wort for the yeast.  This strengthens the cell walls of the yeast and allows for healthier and better prepared yeast in a high gravity environment.         

Monday, April 23, 2012

Kilt-Lifter Scottish Wee Heavy

I've brewed this wee heavy before and I thought it was good so I deiced to try my hand at this recipe again and keg it.  The term "Wee Heavy" is just another name for a Scottish Strong Ale.  This wee heavy has some peat smoked malt that imparts a subtle smokiness to the beer and stylistically has lower carbonation closer to English style beers.  Scotland, as one might imagine, has a rich brewing history. Ancient Greek explorers even commented on the fact that the inhabitants of Caledonia (Ancient Scotland) were skilled in the art of brewing a potent beverage.  The Scots had a unique way of distinguishing beer style by price.  Scottish beers were separated and named by price (shilling).  It was largely understood that:

Light
(60/-) was under 3.5% abv
Heavy
(70/-) was between 3.5% and 4.0% abv
Export
(80/-) was between 4.0% and 5.5% abv
Wee heavy
(90/-) was over 6.0% abv
(/- is read as "shilling" or "bob" as in "a pint of eighty-bob, please")

Mash in was 170*F (Strike) to hit 154*F and kept it for 60 mins (1 qt/lb).  Mash went smooth and mostly uneventful except that the addition of 6 gals of sparge water (1.47 qt/lb) caused my 10 gal mash-tun to overflow a bit.  Evidently I need to fix that in my program (beer tools pro).  The program has seemed to stop calculating water level in containing vessel.  There was a lot of grain on this one (16.3 lbs) so that's why the sparge water was a bit over the mash-tun.  


My eff. was fairly good for such a big batch  (69%).  Was shooting for 65%.  Started at 7.9-8 gals pre-boil vol.  Boiled for about 80 mins down to around 5.25 gals.  I did end-up adding a late addition of 1.5 lbs of light DME to the boil.  That puts me at 1.091 starting gravity.  The final gravity on this beer should be higher (Maybe around 1.023).  So I figure it will weigh in around 8.7-9% ABV.

New Plate Counter Flow Chiller
My new counter-flow plate chiller worked like a charm.  Went from boiling to around 60*F with-in 20 mins.  Transferred the wort to my 6.5 gal carboy added O2 and pitched my 1.5 quart starter from my stir plate.  Ferment around 63-65*F for about 7 days.  Then I'll raise to 70*F for another 7 days and keg.